Mon 29 June 2020:
Like any tool we use every day, our laptops accumulate dust, grime, oils from our skin and who knows what else. Yours is probably due for a cleaning, and here’s how to do it right.
Can you see some crumbs wedged between the keys? Do some have a shiny or oily coat of god knows what? Perhaps it’s a thin layer of dust you notice upon closer inspection? Don’t even get started on the screen – it likely is reminiscent of a crime scene with that many fingerprints.
Of course, this may not be the case for the scrupulous or those that prize their tech. And especially since the novel coronavirus entered our lives, most of us have been paying more attention to the surfaces we touch. Though the jury is still out on how easy it is to get infected with the coronavirus via surfaces, the World Health Organization has prompted people to be extra clean after announcing that the virus may be able to survive on certain surfaces for a few hours or even up to several days.
So if you feel like your keyboard and screen are looking a bit funky, here’s what you should do.
After assessing the damage, roll those sleeves up for a tried-and-true method: shake, brush and blow. Before you start, make sure your computer is turned off – completely.
First, carefully flip your keyboard upside down and give it a gentle few taps or a careful shake to see what forgotten treasures were hidden in there. Last week’s breakfast bagel? Check. Rogue strand of hair? Check. If that was enough to gross you out, now it’s time to go deeper.
Get a soft brush, an old clean toothbrush or fluffy make-up brush (must not shed) will do, and run it between the gaps on your keyboards to dislodge remaining crumbs. You could also swap out the brush for some special electronic cleaning putty to collect remainders. A small-tipped Q-tip could also prove handy to clean up the gaps.
Then comes the next step: blow it out, but not with a vacuum cleaner though. Many people turn to vacuums thinking they will be very effective, but it only creates static electricity, which could cause serious damage to the keyboard circuit. Your safest bet will be to buy a can of compressed air. Another tip is to tilt your keyboard on its side when doing this to prevent the debris from falling back into it or hitting your face.
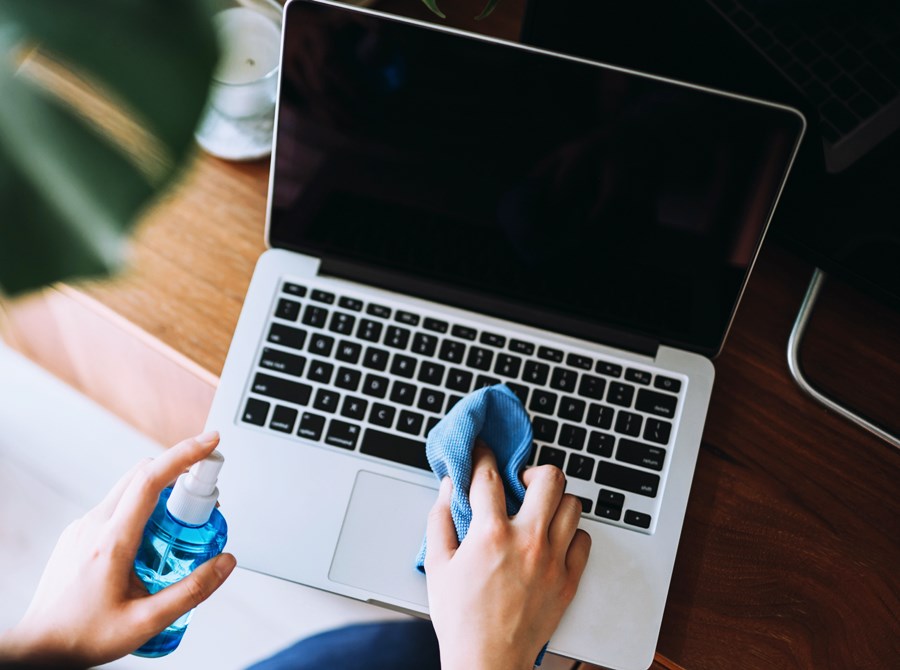
With all dry debris out the way, now is when you should go in with the liquids. If you spot a greasy film on the keys or see some yellowing and stains, you will need a dampish, all-purpose cloth. You may want to spray some disinfectant on the cloth to rid the surface of viruses but always consult the manufacturers’ guidebook to save yourself from being sorry later.
Though some recommended trying the unorthodox, and also daring, method to place the keys of a mechanical keyboard in a dishwasher (though without using soap and at a warm temperature, with no drying) to ensure complete hygiene, experts warn that residue from the water itself may get left behind and cause connectivity issues. As no manufacture explicitly recommends going to this length to get a super clean keyboard, it should go without saying that popping your keyboard or keys in a washer will void it of any warranty.
And a great useful tip overall: Before you start removing your keys, take a photo. Not only will it be great to compare the before and afters but it will also help you place the keys in the correct spots.
When it comes to screens it is even simpler: a lint-free cloth and some mild soapy water.
Use a dry and soft micro-fiber cleaning cloth and then wet it with either some washing-up liquid or some mild soap and water. Wring it out good until it is only damp and without too much pressure wipe your screen, from the outside in, to get rid of marks and the dust collected on it. If you do it from the center-out, you risk getting dirt lodged in the sides of the screen.
Also, never use sponges, cloths with rough surfaces or paper towels and tissues to wipe down your screen. Paper tissues can scratch the display as it contains wood.
Mouse
If you use an external mouse, you might want to give it a little love, too. Optical mice, which use light to detect surface area, require no internal cleaning—but the outside can get sticky over time. Mechanical mice are more susceptible to dust particles that can get caught inside. Stickiness and dust can lead to a stiff mouse that just doesn’t work as you want it to.
Start by unplugging the mouse from your computer and removing any batteries. Use a clean cloth with a little bit of alcohol to wipe the outside of the mouse clean; be careful not to get any liquid inside. If you have a mechanical mouse, you can give it a quick clean by placing it on a piece of paper and moving the mouse around on there. Some of the dust should just roll off by itself.
For a deeper clean, turn it over and rotate the ball-cover ring counter clockwise to get the ball out. Again, use an alcohol-dampened cloth to clean both the ball and the inside of the mouse. Once it’s completely dry, reassemble the pieces and reconnect your spruced up mouse to your computer. If you’re reconnecting your mouse to a PS/2 port, make sure you plug it back in before you turn on the computer.
Mousepad
If you’re using a plastic or rubber mousepad, you can scrub it clean with a cloth dampened by some water and a little hand soap or shampoo. If it’s made of fabric, you might want to run it a soapy bath and scrub it with your cloth. You can also put it in the washer machine, as long as you use cool water. For best results, let your mousepad air dry.
Keyboard
If you’re a multitasking heathen who eats while using the computer… well, you’re just like everyone else. It also means you have crumbs between, on, or inside your keys. You need to get those out before you come in with the damp cloth—like sweeping the floor before mopping.
Think your friends would be interested? Share this story!